Design Ideas to Turn Your Outdoor Kitchen Into a Backyard Oasis
You know that feeling when you step into a friend’s backyard and everything just works—the grill’s humming, the bar stools practically invite you to sit, and the lighting makes the whole space feel like summer vacation? That’s the goal. Turning your custom outdoor kitchen into a bona fide backyard oasis isn’t just about buying a big grill; it’s about designing an experience. Here’s how to do it—step by step.
Define Your Vision
Assess How You Cook & Host
Are you a weeknight griller, a Sunday smoker, or the type who hosts twelve-person taco nights? Your habits drive your design. If you cook solo, a compact L-shape with close reach zones is perfect. If you host often, a pass-through counter and bar seating keep guests nearby but out of your prep path. Picture your best night: who’s there, what you’re cooking, and how people move. Design to that.
Climate & Site Considerations
Sun patterns, wind direction, and nearby trees matter. Morning sun and afternoon shade? Chef’s kiss. Strong prevailing winds? Add a windbreak with a slatted screen or hedge. If you get summer downpours, incorporate a pavilion or retractable awning. Snowy winters? Opt for freeze-resistant surfaces, covered outlets, and a storage plan for soft goods.
Budgeting and Phasing Smartly
Think “core now, extras later.” Run utility lines once, even if you don’t install every appliance immediately. Start with the grill, counter, sink, and lighting. Add the pizza oven, kegerator, and pergola next season. Phasing protects your budget without sacrificing the long-term plan.
Outdoor Kitchen Layouts That Flow
Straight-Line (Galley)
A single run along a wall or fence suits narrow yards. Put the grill near one end, prep space in the middle, and a small sink and fridge at the opposite end. Keep at least 24–36 inches of uninterrupted prep area.
L-Shaped
The classic. One leg for hot and prep, one for cold and clean-up. The inside corner is handy for appliances you don’t use constantly (like an ice drawer).
U- or C-Shaped with an Island
Ideal for entertainers. The island creates a social buffer—guests get seating, you get workflow. If you add a raised bar ledge, you hide the prep mess and gain a serving perch.
Clearances & Work Triangle Basics
Leave 36–48 inches of walkway behind seating. Keep 12–18 inches of landing space on either side of the grill, and 24 inches next to the sink. Don’t crowd the fridge and grill together—give them breathing room.
Create Functional Zones for Your Outdoor Kitchen
Hot Zone (Grill, Smoker, Pizza Oven)
This is your power center. Use non-combustible surrounds, splash guards, and a nearby landing ledge for trays. If you love pizza, set the oven so the opening faces the social area—it’s immersive dinner theater.
Cold Zone (Fridge, Ice, Beverage Center)
Place drinks where guests can self-serve without stepping into your cooking lane. An undercounter fridge with a small ice drawer keeps the party humming.
Wet Zone (Sink, Dishwasher, Cleanup)
Even a bar sink saves time and reduces trips inside. Include a pull-out trash and paper towel drawer nearby. If adding a dishwasher, use a model rated for outdoor use.
Dry Zone (Prep, Storage, Serving)
Think uninterrupted counter stretches, cutting boards, spice drawers, and utensil holders. If you bake or roll dough, consider a cooler-to-the-touch surface (like porcelain or certain sintered stones) for a dedicated station.
Social Zone (Bar, Pass-Through, Dining)
Bar overhangs, counter seating, banquettes, and a dining table shape how people gather. If space is tight, a narrow café table with stackable chairs works wonders.
Zone & Clearance Cheat Sheet
|
Zone |
Recommended Clearance | What It Includes |
Pro Tips |
|
Hot (Grill/Smoker/Oven) |
12–18″ landing each side; 36″+ behind | Grill, smoker, pizza oven |
Use heat shields near seating; add tool hooks. |
|
Cold (Beverages) |
24″ landing near fridge/ice | Undercounter fridge, ice drawer, kegerator |
Place on guest side to reduce traffic in cook lane. |
|
Wet (Cleanup) |
24″ landing one side | Sink, dishwasher, trash |
Add GFCI outlet for small appliances. |
|
Dry (Prep/Serve) |
36–48″ clear counter span | Cutting boards, spices, storage |
Prioritize shade over prep to keep food safe. |
|
Social (Seating) |
24″ per stool; 36–48″ aisle | Bar, island, banquette |
Raise bar ledge to hide prep mess and heat. |
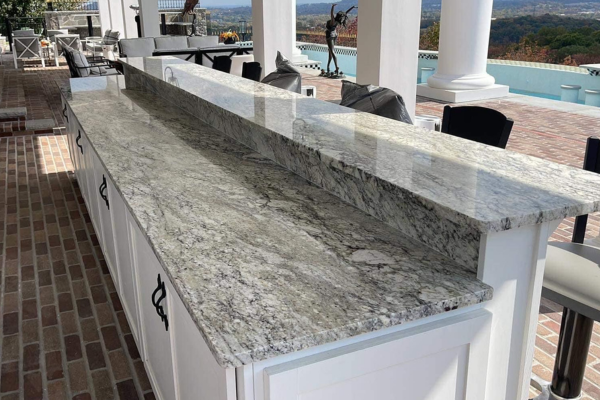
Surfaces & Materials That Last
Countertops
Choose materials that resist UV, heat, and stains. Sintered/porcelain slabs, certain granites, and concrete with a quality sealer are excellent. Leave 10–12 inches of overhang for seating and 1½ inches thickness (or build-up) for a substantial look.
Cabinets & Enclosures
Stainless steel with a powder-coated finish, marine-grade polymers (HDPE), and sealed masonry are top performers. Add venting under grills and storage to protect components and meet manufacturer specs.
Flooring & Hardscape
Textured porcelain pavers, natural stone, and concrete with anti-slip finish keep feet safe. Use a subtle slope (about 1–2%) away from the kitchen for drainage.
Backsplashes & Cladding
Stacked stone, porcelain panels, or stucco unify the kitchen with the house. A 6–10 inch backsplash behind hot zones protects walls and looks finished.
Shade & Shelter
Pergolas, Pavilions & Awnings
A pergola frames the space and supports lighting, fans, or misters. For true rain protection, consider a solid-roof pavilion or a retractable awning rated for exterior use.
Wind, Rain & Sun Angles
Use screens, hedges, or louvered panels to deflect wind. Position the grill downwind of seating. Map the sun’s path to orient prep and seating in the shade during your typical cook window.
Fire Safety & Clearances
Keep combustible materials (wood posts, fabric, shade sails) the required distance from grills and chimneys. Heat deflectors and insulated grill jackets help in tight layouts.
Layered Lighting for Mood & Safety
Task Lighting
LED spots under a pergola beam or directional fixtures over the grill make cooking easy after dark. Add under-cabinet lights for the prep run.
Ambient & Wayfinding
Post lights, bollards, and path lights create a soft glow and prevent trips. Consider indirect cove lighting under bar ledges.
Accent, Sparkle & Smart Controls
String lights, niche uplights in planters, and toe-kick LEDs add the magic. Smart dimmers and scenes let you move from “cook mode” to “party mode” with one tap.
![]()
Outdoor Kitchen Must-Have Appliances & Features
- Grills & Smokers : Gas for weeknights, charcoal or pellet for flavor, or a hybrid setup for flexibility. Side burners or a power burner support woks, stockpots, and fries.
- Pizza Ovens: Countertop or built-in? Wood-fired drama or gas-fired convenience? Place near seating and include heat-resistant landing space.
- Sinks, Trash, Drawers & Pull-Outs : A simple bar sink plus a pull-out trash drawer creates a functional cleanup hub. Add sealed drawers for spices and utensils.
- Kegerators & Beverage Centers: A kegerator, ice bin, and bottle storage make a host’s life easier. Keep this zone at the social edge of the kitchen.
Utilities & Planning to Consider for Your Outdoor Kitchen
- Gas Lines, Electrical, Water: Plan trenches and stub-outs early. Run extra conduit for future upgrades. Label shut-offs clearly, and keep them accessible.
- GFCI, Shut-Offs & Code Basics : Use outdoor-rated outlets and fixtures. GFCI-protect all countertop receptacles. Keep outlets near appliances and a dedicated one for the rotisserie or pellet grill.
- Off-Grid Ideas: Solar & Battery: If you love tech, a small solar array with a battery bank can handle string lights, chargers, even a projector for movie nights.
Seating & Social Layouts
Bar Seating & Islands
Allocate about 24 inches per stool and 12 inches of knee space. A raised ledge keeps guests comfortable away from grill heat.
Lounge & Fire Features
A sectional with a low fire table draws people after dinner. Orient so smoke drifts away from seats (and your neighbor’s fence).
Kid- and Pet-Friendly Ideas
Nonslip pavers, rounded corners, and a gated side keep the space safe. Use a soft patch of turf for play within sight of the chef.
Comfort Add-Ons for Outdoor Kitchens
Fans, Misters & Shade Sails
Ceiling fans under a pavilion or misting lines along a pergola beam make summer evenings actually pleasant.
Heaters & Fire Tables
Infrared heaters extend shoulder seasons without blowing away your napkins. Fire tables deliver warmth and a focal point.
Sound, Screens & Projectors
Weatherproof speakers, a pull-down screen, and a short-throw projector transform the patio into an outdoor theater.
Style Your Outdoor Kitchen Oasis
Color Palettes & Finishes
Pick a palette that complements your home—think warm wood tones with charcoal metal, or crisp white with light oak and soft gray stone.
Plants, Planters & Green Screens
Tall planters define edges and add privacy. Herb planters near the prep zone are practical and fragrant.
Textiles, Rugs & Outdoor Art
Performance fabrics, washable rugs, and UV-stable art bring indoor comfort outside. Keep a storage bench for cushions when storms roll in.
Small Space & Budget-Friendly Moves
Modular & Rolling Elements
A rolling prep cart or modular grill station offers flexibility and easy winter storage.
Fold-Down Counters & Smart Storage
Flip-up shelves expand space on cook nights. Vertical storage for peels, tongs, and boards keeps counters clear.
Phase Your Build
Do utilities and hardscape now, appliances later. You’ll save on rework and keep momentum.
Sustainability & Low-Maintenance Choices
Native Plants & Drip Irrigation
Use drought-tolerant plants and drip lines to cut water usage. A mulch layer keeps soil cool and reduces weeds.
Permeable Pavers & Drainage
Permeable surfaces reduce puddles and help recharge groundwater. Add a trench drain along long counter runs if needed.
Durable, Recycled & Repairable Materials
Powder-coated metals, HDPE cabinetry, porcelain pavers, and sintered stone counters age gracefully and simplify maintenance.
![]()
Project Timeline & Steps to Consider While Building an Outdoor Kitchen
Measure, Mock-Up & Mark Utilities
Tape outlines on the patio, set up folding tables as “counters,” and rehearse your workflow. Mark gas/electric/water routes with paint.
Permits & Pros
Consult pros for gas, electrical, and structural work. Submit plans early if permits are required—lead times can surprise you.
Install Sequence & Punch List
Pour or prep the pad, run utilities, build cabinets, set appliances, then tops. Finish with lighting, décor, and a final safety check.
Real-World Design Recipes For Outdoor Kitchens
Coastal Breeze Kitchen
White porcelain counters, driftwood-tone cabinets, blue tile splash, rope pendants, and a herb planter wall. Add a beverage drawer by the seating.
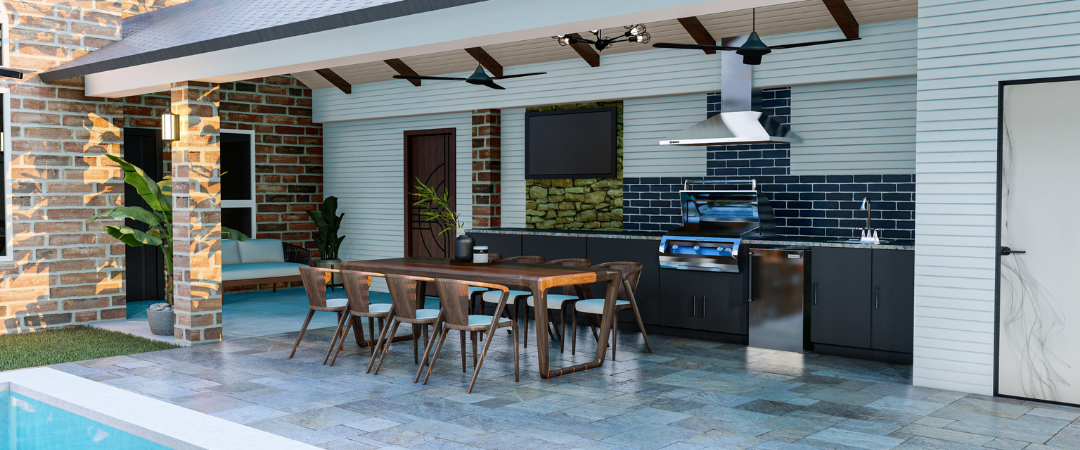
Modern Minimal Retreat
Charcoal sintered stone, black powder-coated cabinets, linear gas grill, hidden trash, toe-kick LEDs, and a concrete-look porcelain floor. Calm and clean.
Rustic Lodge Hangout
Stacked-stone island, chunky wood shelves (away from heat), hammered-metal pendants, and a wood-fired oven. String lights overhead for that camp vibe.
Common Mistakes to Avoid With Your Outdoor Kitchen
- Crowding the grill and fridge—heat and cooling don’t mix.
- Skimping on prep space—you’ll want 36–48 inches of clear counter.
- Forgetting shade—guests (and salads) wilt in direct sun.
- Ignoring drainage—standing water ruins floors and moods.
- Under-lighting—task, ambient, and accent lighting are all essential.
Maintenance & Care For An Outdoor Kitchen
Keep your oasis sparkling with a simple, seasonal routine.
Maintenance Planner for Outdoor Kitchens (Seasonal)
|
Season |
Task | How-To |
Time |
|
Spring |
Deep clean counters & grill | Use pH-neutral cleaner; degrease grates; re-season cast iron. |
60–90 min |
|
Summer |
Check gas & GFCI | Soap-test gas connections; test GFCI outlets; wipe fan blades. |
30–45 min |
|
Fall |
Seal stone & tighten hardware | Apply recommended sealer; check hinges, handles, and caulk lines. |
45–60 min |
|
Winter |
Cover & store textiles | Use breathable covers; wash and store cushions; drain lines in freeze zones. |
30–60 min |
Pro tip: Keep a small caddy stocked with outdoor-safe cleaners, microfiber towels, a brass grill brush, and replacement AA/AAA batteries for igniters and remotes.
Conclusion
An custom outdoor kitchen becomes a backyard oasis when every piece—layout, zones, materials, shade, light, seating, and style—supports how you actually live. Start with a clear vision, nail the workflow, and layer in comfort and personality. Whether you’re flipping weeknight burgers or hosting a wood-fired pizza party, a thoughtful design turns “the patio” into the place everyone wants to be.
Frequently Asked Outdoor Kitchen Questions
‣ How much counter space do I really need?
Plan for at least 36–48 inches of continuous prep space, plus 12–18 inches of landing space on each side of the grill. More if you host large groups.
‣ What’s the most durable outdoor countertop?
Sintered/porcelain slabs and certain dense granites are top-tier for UV, heat, and stain resistance. Concrete is great too with a high-quality sealer and regular maintenance.
‣ Can I put a fridge next to the grill?
It’s better to separate hot and cold zones by a cabinet run or vertical divider. Heat shortens appliance life and makes the fridge work harder.
‣ Do I need a sink?
A small bar sink drastically improves workflow and hygiene, especially if you prep outdoors. If plumbing is a challenge, consider a portable handwash station for phase one.
‣ What’s an easy first step if I’m on a tight budget?
Run utilities and set up a modular or rolling station. Add shade and lighting next. Then phase in built-ins, counters, and specialty appliances as you go.